Why we switched from DHL to FedEx and DPD

Warum wir von DHL zu FedEx & DPD gewechselt sind – RetroBuddys
RetroBuddys — Versand & Logistik

Warum wir von DHL zu FedEx und DPD gewechselt sind

Günstigere Konditionen, zuverlässigere Zustellung und ein neues Werkzeug, das echte Transparenz in jeden Versandpreis bringt — die Geschichte hinter unserem Carrier-Wechsel und was das für euch bedeutet.

Wer uns kennt, weiß: Bei RetroBuddys geht es nicht nur darum, Amiga und C64 Addons, seltene Konsolen, Handheld-Klassiker und Retro-Cartridges zu finden — es geht darum, sie sicher und verlässlich zu euch zu bringen. Versand ist kein Nachgedanke, sondern ein zentraler Teil dessen, was wir tun. Und nach intensiver Analyse, langen Gesprächen mit Carrier-Partnern und einer wachsenden Internationalisierung unseres Sortiments war es Zeit für eine grundlegende Entscheidung: Wir wechseln unsere primären Versandpartner.

DHL bleibt auf ausdrücklichen Wunsch weiterhin buchbar — dazu gleich mehr. Aber der Standard bei RetroBuddys heißt ab sofort: FedEx für den nationalen und internationalen Express- und Luftversand sowie DPD als “Low Cost” Alternative für die EU und den nationalen Markt.

Die ehrliche Wahrheit über die Kosten

Jahrelang war DHL für uns, wie für viele deutsche Online-Händler, der Standard. Die Infrastruktur ist vertraut, die Marke bekannt. Doch je stärker unser Geschäft in Richtung internationaler Kunden gewachsen ist, desto deutlicher wurde: Die Konditionen, die DHL kleineren spezialisierten Händlern anbietet, können mit dem nicht mithalten, was uns FedEx und DPD ermöglichen.

Der Unterschied ist nicht marginal. Bei vergleichbaren Sendungsgewichten und Destinationen — besonders im Expressbereich und bei internationalen Paketen — lagen unsere Versandkosten mit DHL systematisch höher. Das ist kein Geheimnis: Größere Volumina und individuelle Vertragskonditionen sind im Carrier-Markt entscheidend, und FedEx hat sich hier als ernsthafter Gesprächspartner erwiesen.

220+
Länder & Territorien im FedEx-Netzwerk
2,1 Mrd.
Pakete lieferte DPD/Geopost weltweit im Jahr 2024
+6,7%
DPD-Wachstum grenzüberschreitendes Volumen Europa 2024

Quellen aus dem Carrier-Vergleichsmarkt wie ParcelABC und Lojistic bestätigen, was wir in der Praxis erlebt haben: FedEx bietet insbesondere im internationalen Express- und Luftfrachtbereich wettbewerbsfähigere Preisstrukturen, während DHL nach wie vor eine Stärke im europäischen Binnenmarkt und im Consumer-Paketgeschäft besitzt. Für ein Unternehmen wie RetroBuddys, das zunehmend Kunden in Großbritannien, Nordamerika, Japan und Australien bedient, ist diese Unterscheidung entscheidend.

Der richtige Versandpartner ist längst kein einfacher Dienstleister mehr, sondern ein strategischer Teil der Wertschöpfungskette — besonders in Zeiten wachsender Kundenerwartungen.

Shipstage, Analyse Versanddienstleister 2025

Servicequalität: Was uns an FedEx überzeugt hat

Kosten allein hätten nicht gereicht. Wir versenden Sammlerstücke — manchmal Jahrzehnte alt, oft schwer ersetzbar. Ein beschädigtes oder verlorenes Paket ist kein Ärgernis, es ist ein echtes Problem für unsere Kunden. Deshalb war Servicequalität das zweite, ebenso wichtige Kriterium.

Was FedEx im internationalen Expressgeschäft auszeichnet, ist die durchgehend streng standardisierte Handhabung von Sendungen. Die Fahrer, die eure Pakete übernehmen, arbeiten nach klar definierten FedEx-Standards für Sicherheit, Zustellprozesse und Umgang mit empfindlichem Inhalt — unabhängig davon, wo sie eingesetzt werden. FedEx kontrolliert dabei die Art und Weise der Zustellung sehr direkt: Erscheinungsbild, Zeitfenster, Zustelldokumentation und die sogenannten “Standards of Service” sind verbindlich. Das schafft eine Verlässlichkeit, die wir in der Praxis spüren.

Für den europäischen Markt ergänzt DPD dieses Bild: Die DPD-Muttergesellschaft Geopost verzeichnete 2024 einen Umsatz von 15,8 Milliarden Euro und stellte erstmals eine öffentliche Beschwerdestatistik zur Verfügung — ein Schritt zu mehr Transparenz und Serviceorientierung, den wir ausdrücklich begrüßen. Mit 97.000 Paketshops und 31.000 Paketstationen in ganz Europa bietet DPD zudem eine hervorragende Infrastruktur für Kunden, die flexible Abholoptionen bevorzugen.

Unsere Erfahrung in der Praxis

Seit dem Wechsel zu FedEx und DPD konnten wir die durchschnittliche Transitzeit bei internationalen Sendungen spürbar verkürzen. Schadensfälle sind selten geworden — und wenn Probleme auftreten, reagiert der Carrier-Support deutlich schneller als wir es zuvor gewohnt waren.

Internationalisierung: Ohne verlässlichen Partner nicht denkbar

RetroBuddys hat sich in den letzten Jahren von einem auf Deutschland fokussierten Spezialshop zu einem Anlaufpunkt für Retro-Enthusiasten aus ganz Europa und zunehmend auch aus Übersee entwickelt. Kunden aus Japan suchen nach deutschen Versionen, Retro Enthuisiasten aus den USA bestellen immer mehr in Europa und britische Kunden haben nach dem Brexit andere Anforderungen an die Zollabwicklung als noch wenige Jahre zuvor.

Diese Internationalisierung ist ohne einen Carrier möglich, der wirklich global denkt und handelt. FedEx ist in über 220 Ländern und Territorien aktiv und bietet dabei Dienstleistungen, die weit über reinen Transport hinausgehen: Zollabwicklung, Dokumentation, Track-and-Trace in Echtzeit und direkte Ansprechpartner für komplexe Sendungsfragen. Das ermöglicht uns, Pakete dorthin zu senden, wohin wir uns vorher kaum getraut hätten — und das mit kalkulierbaren Kosten und echten Zustellgarantien.

Externer Kontext

Laut dem Logistikanalysten Lojistic (2024) liegt FedEx’s Stärke eindeutig im internationalen Expressbereich sowie im nordamerikanischen und asiatischen Markt — genau jene Destinationen, auf die wir unsere Expansion ausrichten. ParcelABC bestätigt: Bei internationalen Expresssendungen ist FedEx besonders für Unternehmen attraktiv, die Verlässlichkeit, Laufzeiten und ein globales Netzwerk in den Vordergrund stellen.

DHL: Weiterhin buchbar — auf Wunsch

Für alle, die DHL bevorzugen: Wir haben den Service nicht eingestellt. Auf ausdrücklichen Kundenwunsch versenden wir weiterhin mit DHL — insbesondere für Kunden, die DHL-Packstationen nutzen oder bestimmte DHL-Sendungsverfolgungssysteme ihrer Unternehmen angebunden haben. Bitte beachtet jedoch, dass der Aufwand bei uns durch abweichende Abwicklung und Preisstrukturen höher ist. DHL-Versand wird daher zu einem leicht erhöhten Tarif angeboten. Bei Interesse wendet euch bitte direkt an uns — wir finden gemeinsam die beste Lösung.
✦ ✦ ✦
Eigenentwicklung

Shipping Buddy: Transparenz, die echte Preise zeigt

Parallel zum Carrier-Wechsel haben wir unser eigenes internes Versandtool weiterentwickelt: Shipping Buddy. Es ist die Grundlage dafür, dass wir euch immer den tatsächlichen Preis zeigen können — nicht ein gerundetes Ungefähr, sondern die echte “Fully-Landed-Rate”.

Fully-Landed-Rate

Shipping Buddy berechnet automatisch die komplette Lieferkosten-Kette: Grundfracht + Treibstoffzuschlag + Zollgebühren + eventuelle Sonderzuschläge für abgelegene Gebiete (Remote Area Surcharge). Was ihr seht, ist das, was ihr zahlt.

Fuel Surcharge: Straße & Luft

Treibstoffzuschläge sind dynamisch und werden von Carriern wöchentlich oder monatlich angepasst. Shipping Buddy unterscheidet klar zwischen dem Straßentransport-Zuschlag (Diesel-basiert) und dem Luftfracht-Zuschlag (Kerosin-basiert, IATA-Benchmark).

Customs Budget

Für Destinationen, in denen uns Zollprozesse noch nicht vollständig vertraut sind, arbeiten wir mit einem kalkulierten “Customs Budget” — einem transparenten Puffer, der Zollabfertigung, Importsteuern und mögliche Bearbeitungsgebühren abdeckt, ohne euch zu überraschen.

Drei Währungen

Ab sofort könnt ihr bei RetroBuddys in Euro, US-Dollar und Britischen Pfund bezahlen — inklusive Echtzeit-Wechselkursen in Shipping Buddy. Kein Umrechnungsrätsel mehr.

Was ist ein Fuel Surcharge — und warum ist er wichtig?

Viele Kunden stoßen zum ersten Mal auf den Begriff “Treibstoffzuschlag” und fragen sich, was das eigentlich bedeutet. Die kurze Antwort: Es ist eine variable Zusatzgebühr, die Carrier erheben, um schwankende Treibstoffkosten transparent weiterzugeben — anstatt sie im Grundpreis zu verstecken.

Konkret unterscheiden wir bei RetroBuddys zwischen zwei Arten:

Fuel Surcharge Straße (Road): Dieser Aufschlag gilt für alle Sendungen, die per Lkw oder Transporter befördert werden — also den größten Teil unserer Europasendungen. Er basiert auf dem aktuellen Dieselpreis und wird typischerweise als Prozentsatz des Grundfrachttarifs berechnet. Je nach Marktlage kann dieser Wert wöchentlich angepasst werden.

Fuel Surcharge Luft (Air): Für internationale Expresslieferungen, die per Flugzeug transportiert werden, gilt ein separater Lufttreibstoffzuschlag, der sich an Kerosinpreisindizes orientiert — international häufig dem USGC-Index (U.S. Gulf Coast Kerosin). Im Expressluftfrachtbereich bewegen sich solche Zuschläge laut Branchenangaben oft zwischen 30 und 60 Prozent des Frachtpreises auf Grund der globalen Energiekrisen.

Transparenz-Versprechen

Shipping Buddy zeigt euch beide Komponenten getrennt aus. Ihr seht immer den Grundpreis, den jeweils aktuellen Fuel Surcharge und die Gesamtsumme — bevor ihr bestellt. Keine versteckten Aufschläge nach der Bestellung.

Customs Budget: Unbekannte Länder, bekannte Kosten

Internationaler Versand bedeutet: Jedes Land hat eigene Zollregeln, Freigrenzen (De-minimis-Werte) und Bearbeitungsgebühren. Für Destinationen, in die wir häufig versenden und wo wir die Prozesse gut kennen — etwa die EU, UK, USA, Japan — können wir euch die anfallenden Zollkosten sehr präzise angeben.

Aber was ist mit Nepal, Kolumbien oder Kasachstan? Hier wird es komplizierter. Um auch für Destinationen, die wir noch nicht vollständig durchleuchtet haben, faire und verlässliche Preise anzubieten, arbeiten wir in Shipping Buddy mit einem Customs Budget: einem kalkulierten Schätzwert, der auf den Warengruppen-Zollsätzen des jeweiligen Ziellandes und typischen Bearbeitungsgebühren basiert. Dieser Wert wird transparent als eigene Zeile ausgewiesen.

Wenn am Ende die tatsächlichen Zollkosten unter dem Budget liegen, erstattet RetroBuddys die Differenz. Liegt er drüber — was selten vorkommt, aber möglich ist — treten wir in direkten Kontakt mit euch, bevor der Auftrag finalisiert wird. Keine bösen Überraschungen beim Empfänger.

Bezahlen in EUR, USD und GBP

Eine der meistgewünschten Funktionen unserer internationalen Kunden war die Möglichkeit, in der eigenen Währung zu bezahlen. Ab sofort ist das Realität:

Euro (EUR)
$ US-Dollar (USD)
£ Britisches Pfund (GBP)

Die Wechselkurse werden täglich aktualisiert. Alle Preise — inklusive Shipping Buddy-Kalkulationen für Versand, Fuel Surcharges und Customs Budget — werden in der von euch gewählten Währung dargestellt. Ihr kauft und zahlt so, wie es für euch am bequemsten ist.

Retro-Gaming kennt keine Grenzen. Unser Versand auch nicht mehr.

RetroBuddys Team, 2026

Fazit: Ein Wechsel, der sich für euch lohnt

Dieser Carrier-Wechsel war keine leichte Entscheidung — DHL ist ein verlässlicher Partner gewesen. Aber unsere Verantwortung gilt in erster Linie euch: unseren Kunden, die Amiga und C64 Addons bei uns kaufen und erwarten dürfen, dass sie sicher, termingerecht und zu einem fairen Preis ankommen.

Mit FedEx als nationalem und internationalem Express-Partner, DPD als Low Cost Alternative für Deutschland und die EU und unserem eigenen Shipping Buddy-Tool sind wir jetzt besser aufgestellt als je zuvor — für das globale RetroBuddys, das wir gemeinsam aufbauen.

Bei Fragen zu konkreten Sendungen, Destinationen oder zu den neuen Zahlungsoptionen stehen wir wie immer per E-Mail zur Verfügung.

Euer RetroBuddys Team

Externe Quellen & Referenzen
  1. ParcelABC: DHL vs. FedEx — Unterschied und Vergleich 2024. parcelabc.de
  2. Lojistic: DHL vs FedEx: 2024 Shipping Comparison. lojistic.com, Aug. 2024
  3. Shipstage: DHL vs. FedEx: vergleich der Services, Preise, Lieferzeiten. shipstage.com, 2025
  4. DPD / Geopost: Stetiges Wachstum dank starker Leistungen im Bereich Out-of-Home und internationale Zustellung. Pressemitteilung 17. März 2025. dpd.com
  5. DPD Deutschland: Für mehr Transparenz & optimierten Service: DPD Deutschland veröffentlicht Kundenfeedback. März 2025. dpd.com
  6. FreightAmigo: Fuel Surcharge Explained. freightamigo.com, 2025
  7. GEODIS: Air Fuel Surcharge — Calculation Method. geodis.com
  8. ShipBob: De Minimis Thresholds and Post-De-Minimis Fulfillment Strategy. shipbob.com, 2025

HID2AMI compatibility list

The HID2AMI USB mouse and gamepad adapter works with a variety of mice, joysticks and gamepads. Enclosed is a list of all tested devices:

Device

Model

Min required fw ver.

Working

Notes

Mice

Any HID Compliant Mouse

v1.0.0

YES

Any HID mouse

Mouse

New USB Tank Mouse

v1.0.0

YES

Mouse

Anker Ergonomic Vertical Mouse

v1.8.4

YES

Mouse

Labtec Optical Mouse 600

v1.8.4

YES

Mouse

Logitech B100

v1.0.0

YES

Mouse

Logitech M570

v1.0.0

YES

Mouse

Logitech G5 Gaming Mouse

v1.8.6

YES

Mouse

Logitech G502 Gaming Mouse

v1.8.6

YES

Mouse

Logitech G Pro Gaming Mouse

v1.8.6

YES

Mouse

Logitech MX510 MX518 G305 G203 G300 G40X G603 G70X G903 RX250

v1.8.7

YES

Mouse

Logitech M-BT83 Wired Mouse

v1.9.2

YES

Mouse

Logitech Performance MX BT

v1.8.7

YES

Mouse

Logitech Wireless Mouse M220, M305, M560, M70X

v1.7.4

YES

Mouse

Logitech Wireless Mouse M590

v1.8.4

YES

Mouse

Logitech Wireless Mouse Mx Master

v1.8.4

YES

Mouse

Microsoft Classic Intellimouse 2018

v1.8.c

YES

Mouse

Microsoft Intellimouse

v1.6.0

YES

Not 100% HID protocol compliant

Mouse

Microsoft Intellimouse Explorer

v1.8.4

YES

Wireless explorer series

Mouse

Microsoft Wireless Laser 6000, 7000

v1.8.4

YES

Wireless explorer series

Mouse

Rapoo 7100P Wireless Mouse

v1.8.6

YES

Mouse

Steelseries Rival 100 and 110

v1.8.6

YES

Mouse

Steelseries Rival 310

v1.8.6

YES

Mouse

Steelseries Rival 500

v1.8.6

YES

Mouse

Steelseries Rival 600

v1.8.7

YES

Mouse

Targus Mini Mouse

v1.7.4

YES

Not 100% HID protocol compliant

Mouse

Trust Wireless 18519 YVI

v1.8.8

YES

Mouse

Yenkee YMS 3007

v1.8.4

YES

Gamepad

8bitd0 SFC30 Bluetooth

v1.8.0

YES

Gamepad

8bitd0 M30 Wireless 2.4G

v1.8.0

YES

Adapter

8bitd0 Wireless adapter 2.4G

v1.8.0

YES

All wireless controllers (xbox ONE, etc)

Joystick

Arcade Stick w/ USB encoder

v1.3.0

YES

Stick is digital only

Joystick

C64 Mini Stick

v1.3.0

YES

Stick is digital only

Gamepad

Diswoe Wireless PC/Nintendo Switch

v1.8.0

YES

Gamepad

Dual Stick China Clone

v1.3.0

YES

Both digital and analog mode

Gamepad

Dual Wireless PS3-USB or BT

v1.9.8

YES

Both digital and analog mode (3)

Gamepad

Hama Whitestorm

v1.3.0

YES

Both digital and analog mode

Joystick

HORI FightingStick Mini

v1.8.0

YES

Both PS3 and PS4 mode

Gamepad

Logitech PS2 Wireless

v1.3.0

YES

Both digital and analog mode

Gamepad

Logitech Rumble Gamepad F310

v1.6.0

YES

Both PC and XBOX 360 mode

Gamepad

Logitech Rumble Gamepad F510

v1.6.0

YES

Both PC and XBOX 360 mode

Gamepad

Logitech Rumblepad 2

v1.3.0

YES

Both digital and analog mode

Gamepad

Logitech Wingman Rumblepad

v1.3.0

YES

Both digital and analog mode

Gamepad

Logitech Wireless Gamepad F710

v1.8.0

YES

Both PC and XBOX 360 mode

Gamepad

PS3/PC Clones

v1.5.2

YES

Both digital and analog mode

Gamepad

RetroLink Classic Controller USB

v1.8.0

YES

(Sega Saturn Style)

Gamepad

SEGA Mega Drive Mini USB Pad

v1.9.1

YES

Joystick

SEGA VirtuaStick High Grade

v1.8.0

YES

PS3 mode – Stick is digital only

Gamepad

Sony PS1 original pad

v1.6.0

YES

With USB adapter

Gamepad

Sony PS2 original pad

v1.6.0

YES

With USB adapter

Gamepad

Sony PS2 original pad

v1.8.1

YES

With DUAL USB adapter (1)

Gamepad

Sony PS-ONE original pad

v1.6.0

YES

With USB adapter

Gamepad

Sony Dual Shock 3 PS3 original pad

v1.8.b

YES

With USB cable or BT WARNING !!! (2) (3)

Gamepad

Sony Dual Shock 4 PS4 original pad

v1.8.0

YES

WARNING !!! (2)

Gamepad

SNES Usb Clone

v1.3.0

YES

Pad is digital only

Joystick

Speedlink Competition PRO USB

v1.8.0

YES

Gamepad

Thrustmaster Firestorm Digital

v1.3.0

YES

Pad is digital only

Joystick

Thrustmaster T-16000M

v1.8.0

YES

Gamepad

Thrustmaster Wireless dual trigger

v1.3.0

YES

Both digital and analog mode

Gamepad

XBOX 360 Clone

v1.6.0

YES

Not HID protocol compliant

Gamepad

XBOX Elite

v1.8.0

YES (*)

(*) works via 8bitdo Wireless dongle

(1) Plug the pad in adaptor #1 port
(2) WARNING! If using the wired version, either remove internal battery (suggested) or be sure it is 100% charged before connecting to your Amiga
(3) Click d-pad (Hat) soon after connection to start auto-reconfiguration of the pad

TF1230 FAQ

The TerribleFire TF1230 is an outstanding accelerator card with a 68030, 50MHz processor and 128MB FastRam for the Amiga 1200.

However, the card is not really “plug & play” and a few things need to be taken into account.

  • TF1230 IDE Interface
    In order for the Amiga to boot from the IDE interface on the TF1230, a special IDE driver – ehide.device – must be loaded. This can either be done in the Kickstart Rom (recommended) or it is booted from floppy disk/internal hard disk and the ehide.device driver is loaded first. The TF1230 IDE interface is considerably faster than the internal IDE port.
    When booting from the TF1230 IDE interface, the CF-IDE adapter must be removed on most Amiga1200s, otherwise the Amiga1200 will not boot at all. If the boot process is interrupted, it may be necessary to install an IDE buffer on the internal IDE port (we do not yet have this in the program).
  • ehide.device
    The driver for the TF1230 interface can be downloaded here => https://www.retrobuddys.com/download/ehide_12.tar.gz. There are 2 versions that have a different size. The one from our website is the one that can be copied into a Hyperion 3.2.2 47.111 Kickstart without deleting other modules.
  • Create boot floppy
    To boot from the TF1230 IDE interface without using modified kickstart roms, a boot floppy must be created with the ehide.device driver, which is loaded via loadmodule in the startup.sequence:

    s:startup-sequence
    loadmodule >NIL: devs:ehide.device

    Loadmodule can be loaded here => https://aminet.net/package/util/boot/LoadModule from Aminet. After booting from the floppy disk and a soft reset (Ctrl-Amiga-Amiga) the TF1230 IDE interface is used for booting.

  • Amiga1200 Timing Fixes
    The Amiga1200 has a few problems with the timings that lead to lockups and freezing of the Amiga1200 – even without the TF1230 card. Therefore the capacitors E123C and E125C on the bottom side of the mainboard should be removed on 1D4 Rev01 and Rev.2B mainboards. On a Rev 2B mainboard, it may also be necessary to replace R118 with a 220 Ohm resistor
  • Unevenness of the edge connector
    A few A1200 mainboards have an unevenness between the short and the long part of the edge connector, which can lead to the connection of the TF1230 card being destroyed. How can this be detected? If the TF1230 card cannot be installed with light pressure, the edge connector is probably uneven.
  • Firmware update
    We have installed the latest firmware on our maps. However, it is possible that Stephen Leary will release a new version. In any case, please only use the version for the Xilink 95288XL CPLD. The XC95144 firmware versions can destroy the card!
  • Kickstart <3.1
    Short answer: You can get the card to run – but we don’t think it makes sense and we only support this in an emergency.
  • Hard disks on the TF1230 IDE interface
    In brief: Real hard disks do not work on the TF1230 IDE interface due to the high power consumption. Please do not use and do not try.

PiStorm FAQ

Over the last few weeks, we have compiled the most frequently asked questions from our customers about the PiStorm in an FAQ. The list is certainly not yet complete and will therefore continue to be added to.

  • Can the Raspberry Pi 5 be used for the PiStorm?
    • No. The Raspi 5 has been changed in many ways and unfortunately cannot (yet) be used.
  • Can the Raspberry Pi 4 be used for the PiStorm Classic or PiStorm 2k?
    • Yes and no. It usually works, but is not officially supported. In other words: If there are difficulties, you are responsible and there will hardly be anyone who can help.
  • Do you sell CaffeineOS?
    • No. CaffeineOS is free software, based on AmigaOS 3.9 and was created by Pedro Cotter. We offer our customers suitable SD cards with the current version of CommunityOS for the price of the SD card. CaffeineOS can be downloaded here => https://bit.ly/m/CaffeineOS and installed on a suitable SD card with the WinImager under Windows. The Win32 Disk Imager can be downloaded here => https://win32diskimager.org/.
  • Do you sell AmigaOS?
    • Yes, we are one of the larger European Hyperion Entertainment partners and sell several hundred licenses every year. AmigaOS 3.2 is commercial software and is constantly being developed further from the license fees. AmigaOS 3.3 has been in development for some time now. Please note that AmigaOS 1.2 – AmigaOS 3.1 is to be licensed from Cloanto. From AmigaOS 3.2 Hyperion Entertainment has the rights to the Kickstart and the Workbench. We offer AmigaOS in different bundles for all Classic Amigas from Amiga500 – Amiga4000 and with images for many common accelerator cards.
  • AmigaOS or CaffeineOS?
    • It depends 🙂 In principle, we recommend the use of CaffeineOS. Beautiful desktop, easy to use and very user friendly. But unfortunately nobody can say how long Caffeine will still exist. It has already disappeared overnight several times and only Pedro Cotter maintains “his” distribution.
    • AmigaOS is commercial software and with the Emu68 imager tool it has become very easy to do a very good basic installation with all the tools you need. However, it is also a very classic 80s/90s workbench desktop and many tools have to be installed manually.
  • Can you recommend the LazaruStorm adapter?
    • The LazaruStorm adapter is the only currently existing possibility not to remove the 68k CPU in the Amiga and still use the PiStorm. However, the adapter is a messy hack and it does not always work, as both CPUs (PiStorm and 68k) “fight” for the bus signals. We supply our LazaruStorm adapters with the recommended jumpering (“VPAJP 2-3” and “BRJP” not bridged). We have had the best experiences with the Amiga 500 Rev 6a mainboards. The adapter usually works here. We can *not* recommend the adapter for Amiga 500 Rev5 or earlier. With Rev8a mainboards the adapter usually works. If the PiStorm does not start, simply press “CTRL-Amiga-Amiga” until it starts. Unfortunately, this is the only possible solution if the PiStorm – regardless of the mainboard version – does not start.
  • Does the PiStorm require cooling?
    • Yes and no. PiStorms with Raspberry Pi 3 and 4 do not require cooling. Only the CM4 module on the PiStorm32 CM4 + I/O module requires its own passive or active cooling. We offer the cooling modules from Waveshare. We generally recommend the active cooler module. The fan runs at 8000rpm +/-10% and is not controllable via the CM4 and I/O board. It is so quiet in operation that you can hardly hear it.
  • Does wired Ethernet work?
    • Yes and no. Under Emu68 (standard and recommended) there is no driver for wired Ethernet. Only under Musashi can wired Ethernet be configured. Linux knowledge is required and it is not easy.
  • Do the mouse and keyboard work via USB?
    • Yes and no. Under Emu68 (standard and recommended) there is still no driver for mouse + keyboard via USB. Only under Musashi USB mice and keyboards can be configured. It is not that easy.
  • What are Emu68 and Musashi?
    • Emu68 is a so-called “bare metal” 68k emulator developed by Michal Schulz. The Github can be found here => https://github.com/michalsc/Emu68. Emu68 is the recommended emulator for the PiStorm – even if some drivers are still missing. Michal’s patron page can be found here => https://www.patreon.com/c/michal_schulz/posts. We support the development regularly.
    • Musashi is a 68k emulator based on Linux, which unfortunately has not been developed further for several years. Without Musashi there would probably be no PiStorm and many of the PiStorm docs still contain references to Musashi. Since Musashi is based on Linux, separate drivers are not required for all possible devices (USB, Ethernet etc pp), so that Musashi supports more hardware on and in the Amiga. However, the emulation is much slower and the configuration is much more complicated. We strongly advise against using it
  • Where can I find documentation and help for PiStorm?
  • How do I control the settings of the PiStorm, especially the emulated processor speed and the graphics resolution for the Amiga?
    • For both CaffeineOS and AmigaOS there are corresponding tools to easily change the command line options via a GUI.
  • Does WLAN/WiFi work?
  • How do I create the required SD card with Emu68 myself?
    • For AmigaOS we recommend the Emu68-Imager Tool. This only runs under Windows 10/Windows 11. MacOS is – also in the future – not supported. It can be found here = https://mja65.github.io/Emu68-Imager/. SD cards of any size from any manufacturer can be used.
    • The image for CaffeineOS can be downloaded here => https://bit.ly/m/CaffeineOS and copied to a 64GB card using the Win32 Imager. Attention: The image is so large that in principle only the 64GB SanDisk Extreme will fit. These are available in our store (with and without CaffeineOS at the same price).
  • Does the entire graphics output run via HDMI?
    • No! “Only” the software that supports Picasso96/RTG is currently output via HDMI. Everything else still runs via RGB and still requires 2 connections to the TV/monitor! The team around Claude Schwarz is currently working on a “Framethrower” for the PiStorm, which also redirects the RGB outputs to the HDMI port of the Raspberry. First demos exist but there is no ETA for the hardware extension (yet). Until then we recommend the parallel use of our RGB2HDMI adapters in the Amiga 500 and Amiga 2000, but it also requires 2 HDMI ports with the adapters *or* all outputs must be output to RGB. This can be configured classically on the Workbench. For the Amiga1200 there is a solution from Indivision that works well (Scan Doubler).
  • Does the sound run via HDMI?
    • No! As with the RGB2HDMI adapters, the sound output from the Paula chip is not “redirected” to the Denise chip and there is no emulation here. As before, small external speakers must therefore be connected to the RCA outputs.

If you have any further questions, please send an e-mail to [email protected].

CaffeineOS SD card

How do I create my own SD card for CaffeineOS?

First of all, you need the latest image of CaffeineOS. Simply request access to his Google Drive via the page of “CaptLeChuck” / Pedro Cotter => https://bit.ly/m/CaffeineOS. The images can be downloaded there as a torrent and as a ZIP file.

Then use the WinImager under Windows to upload to the SD card => https://win32diskimager.org/

WiFi is now super stable under CaffeineOS and even SMB share access works. The configuration is explained in this video: https://www.youtube.com/watch?v=YKYbILbx1p8 (English)

The recommended SD cards are the SanDiskUltra 32GB for images up to 9275 and the SanDiskExtreme 64GB for 64GB images. Both can be ordered from our store with the latest CaffeineOS. Other SD cards – whether 32GB or 64GB – may be too *small* for the image. This is because every SD card manufacturer “interprets” 32GB or 64GB differently.

Of course we do not “sell” CaffeineOS. CaffeineOS is free software, so the SD cards in the store with and without CaffeineOS have the same price. Only if the SD card is ordered together with a PiStorm is it slightly cheaper.

Shipping flat rate

Increase in the flat-rate shipping fee

Dear customers,

Unfortunately, due to increased costs at DHL, we have to increase our domestic shipping costs slightly. From the current €4.99 to €5.50. As a bulk buyer, we now pay €6.10 per parcel (up to 2 kg). If things get a little heavier, we are prepared to pay €6.50. Alarming but unfortunately true – and this with an annual shipping volume of around 3000 parcels.

Everything remains the same for our European customers. Even if the €14.99 does not cover the costs, we will continue to pay a similar amount as for domestic German parcels.

4-way kickstart switcher

Positive growth.

Nature, in the common sense, refers to essences unchanged by man; space, the air, the river, the leaf. Art is applied to the mixture of his will with the same things, as in a house, a canal, a statue, a picture.

But his operations taken together are so insignificant, a little chipping, baking, patching, and washing, that in an impression so grand as that of the world on the human mind, they do not vary the result.

The sun setting through a dense forest.
Wind turbines standing on a grassy plain, against a blue sky.
The sun shining over a ridge leading down into the shore. In the distance, a car drives down a road.

Undoubtedly we have no questions to ask which are unanswerable. We must trust the perfection of the creation so far, as to believe that whatever curiosity the order of things has awakened in our minds, the order of things can satisfy. Every man’s condition is a solution in hieroglyphic to those inquiries he would put.

ATTENTION: All pictures refer to an Amiga 500 Rev.6A. If you own a different board revision or a different Amiga, then the positions on the photos will differ! In case of doubt or basic questions, please send a short email to [email protected] with the exact model / revision BEFORE installation. Please always carry out installations/removals on an ESD mat with potential equalization. Never stand on a (polyester) carpet during installation. If no professional chip puller tool is available (see photo) Please lever out the chips *carefully* with a small electric screwdriver from both sides at the same time. Never lever out one side first and then the other! This can (will…) damage the chips of your Amiga. In case of crooked legs, straighten the chip *carefully* on an ESD mat with little pressure. If a leg is crooked/clenched *very carefully* press the leg straight with very small pliers/tweezers. If you have no installation/conversion experience at all, we will be happy to install the parts you have purchased from us at a flat rate of €30 plus 2*postage and provide a functional warranty. We assume that you know how to open your Amiga! If you have any difficulties with this, please send an e-mail to [email protected] As soon as you have opened your Amiga, please remove the existing Kickstart Rom from the socket and align it (small notch, round dot, semicircle on the chip side). Normally the notch on an Amiga 500 Rev 6a points to the rear of the connection ports. Now you can insert the 4-way Kickstart Switcher into the socket. The alignment of the notch should correspond to the alignment on the mainboard. The cables are usually aligned towards the rear of the connection ports. You can now either route the two switches through the flaps of the side expansion port or carefully drill 2 holes in the housing of your Amiga. Please note that there are different versions of the switcher for the different Amiga 500 motherboard revisions (Rev.5, Rev.6a). For earlier versions than 5a there is *no* working switcher and with the Rev 8/Amiga 500+ you have to solder on the mainboard, as important resistors were not fitted from the factory. If you need further hardware mods, a Gotek drive, a complete Amiga, a PiStorm or just cables, please contact us. With your next order in our webshop www.retrobuddys.com you will receive free delivery with your personal voucher code 8ybykhw9. If you are missing something in the webshop, please ask by e-mail ([email protected]). We have *almost* everything for your Amiga 500, 600, 1000, 1200 and 2000.

4MB Amiga 600 FastRam extension

4MB Amiga 600 FastRam extension

In case of doubt or basic questions, please send a short e-mail to [email protected] BEFORE installation.

Download Amiga TestKit by Keir Fraser => https://github.com/keirf/amiga-stuff/releases/download/testkit-v1.20/AmigaTestKit-1.20.zip

Please always carry out installations/removals on an ESD mat with potential equalization. Never stand on a (polyester) carpet during installation.

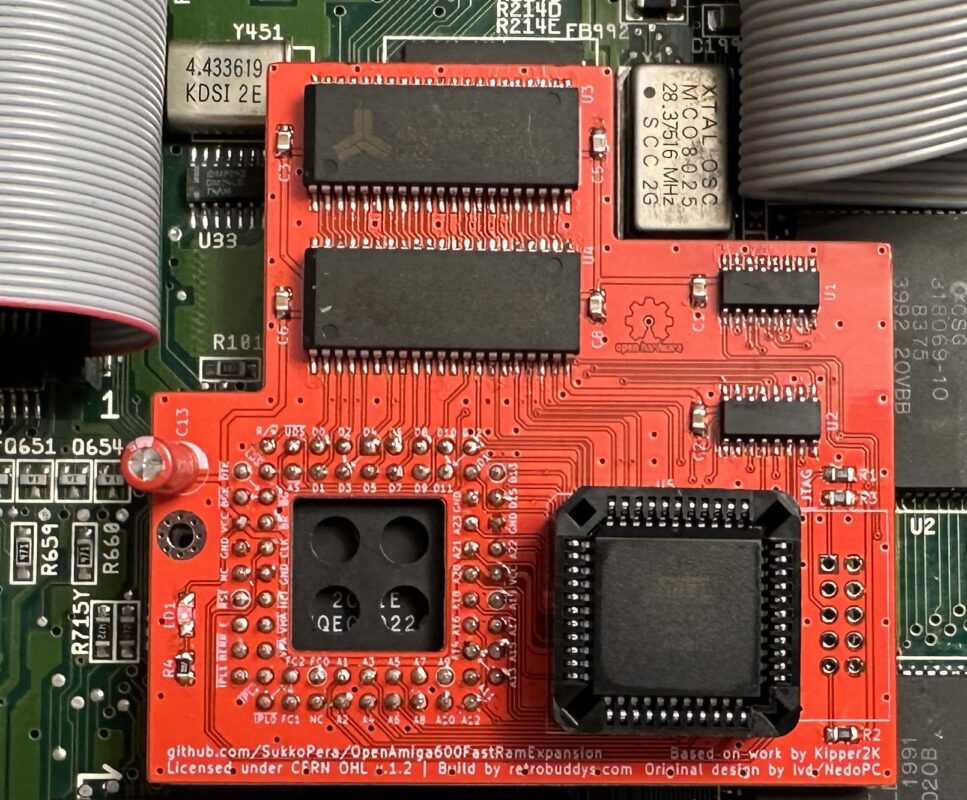
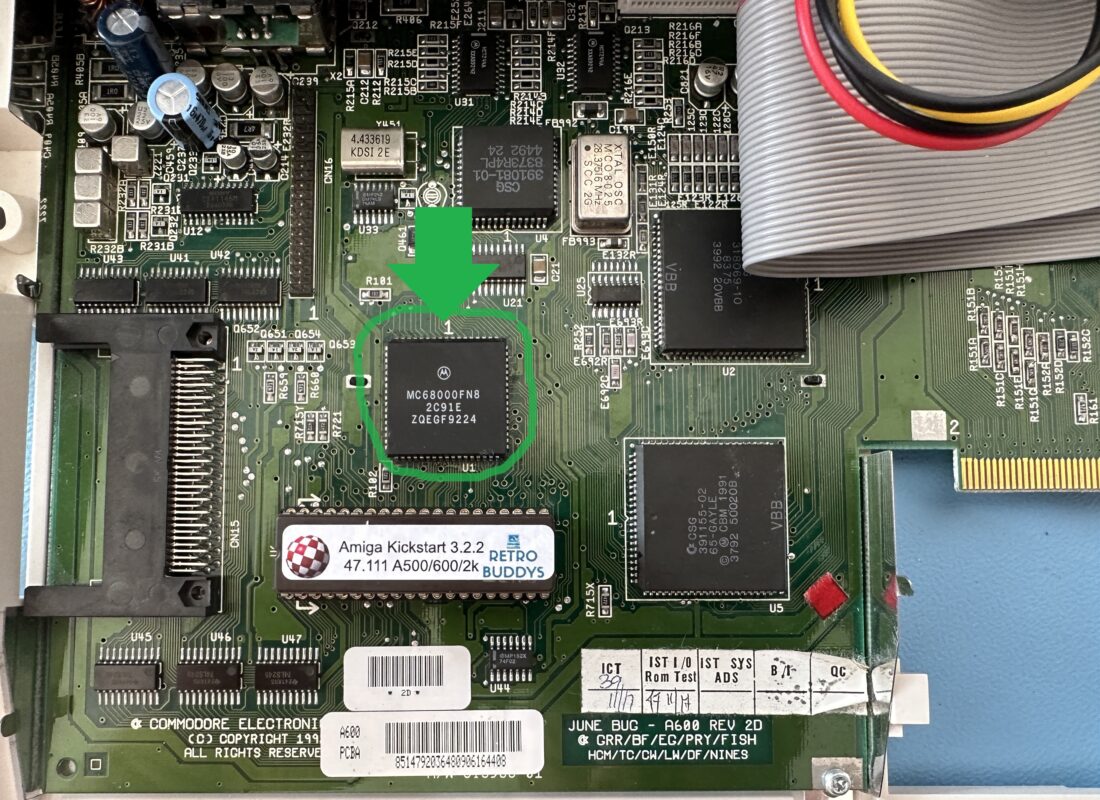
You are now ready to install the expansion into your A600, but before you do, we recommend cleaning the CPU pins with contact cleaner or isopropyl alcohol and a toothbrush or cotton swab, as they have probably accumulated all sorts of gunk/lint/etc. over the years.

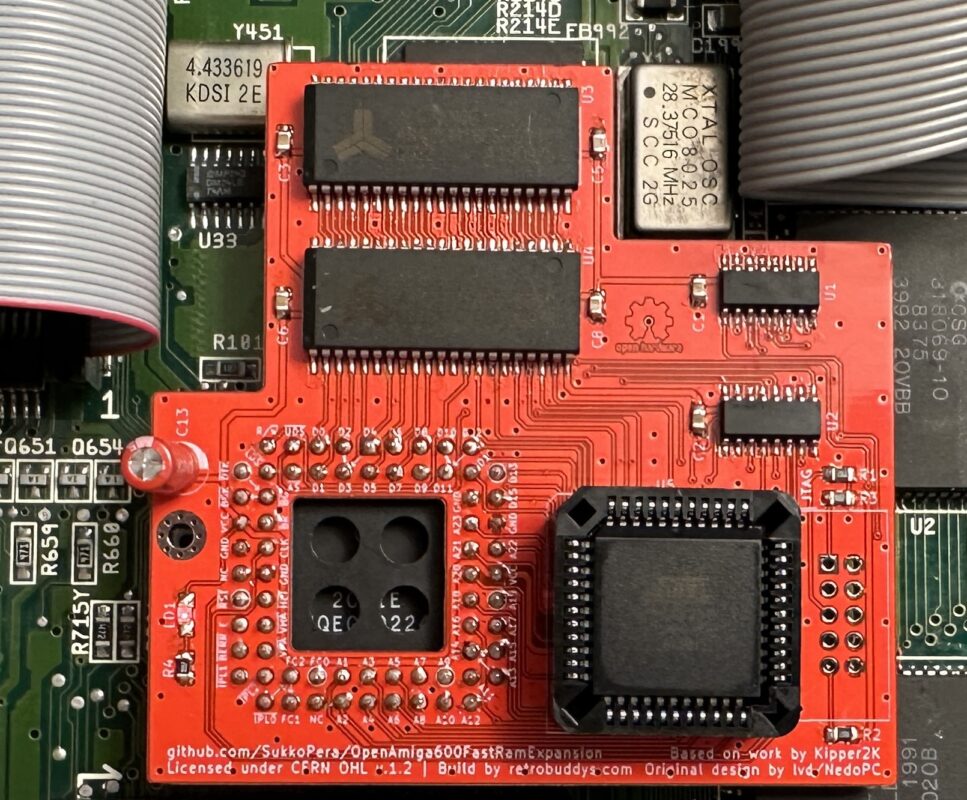
Allow the CPU to dry well and then place the extension on the CPU in the correct orientation and press it down firmly until it feels firm. No effort should be required.

The socket on the memory expansion is modified and the chip is actually inserted there and not plugged in from above. Therefore, please do not constantly insert and remove it, otherwise the socket will wear out very quickly. If possible, do not shake, turn or place the computer horizontally after installation.

Before you reassemble the case, we recommend running Amiga TestKit. Use the memory option (F1), 4 MB Fast RAM must be displayed. Then start the memory test (F1 again) and let it run for 20-50 cycles: If the TestKit does not find any errors, the memory expansion is seated correctly. If errors occur, switch off the computer and try to fit the extension better by pushing it further down or turning it slightly back and forth.

It can happen that the card slowly moves out of the base over time. To avoid this, you can anchor it to the motherboard using the hole to the left of the CPU, which should match one of the holes for the feet of the hard disk bracket.

Note that, as already mentioned, the PLCC socket is not intended for this type of use, which means that the contact quality deteriorates a little each time the board is inserted or removed. So try not to remove them unnecessarily. If you notice that the contact has deteriorated so much that the machine is no longer stable, the base must be replaced.

Each memory expansion has been extensively tested by us and has been written, read and verified for at least 50 cycles with the “Amiga Testkit” without errors.

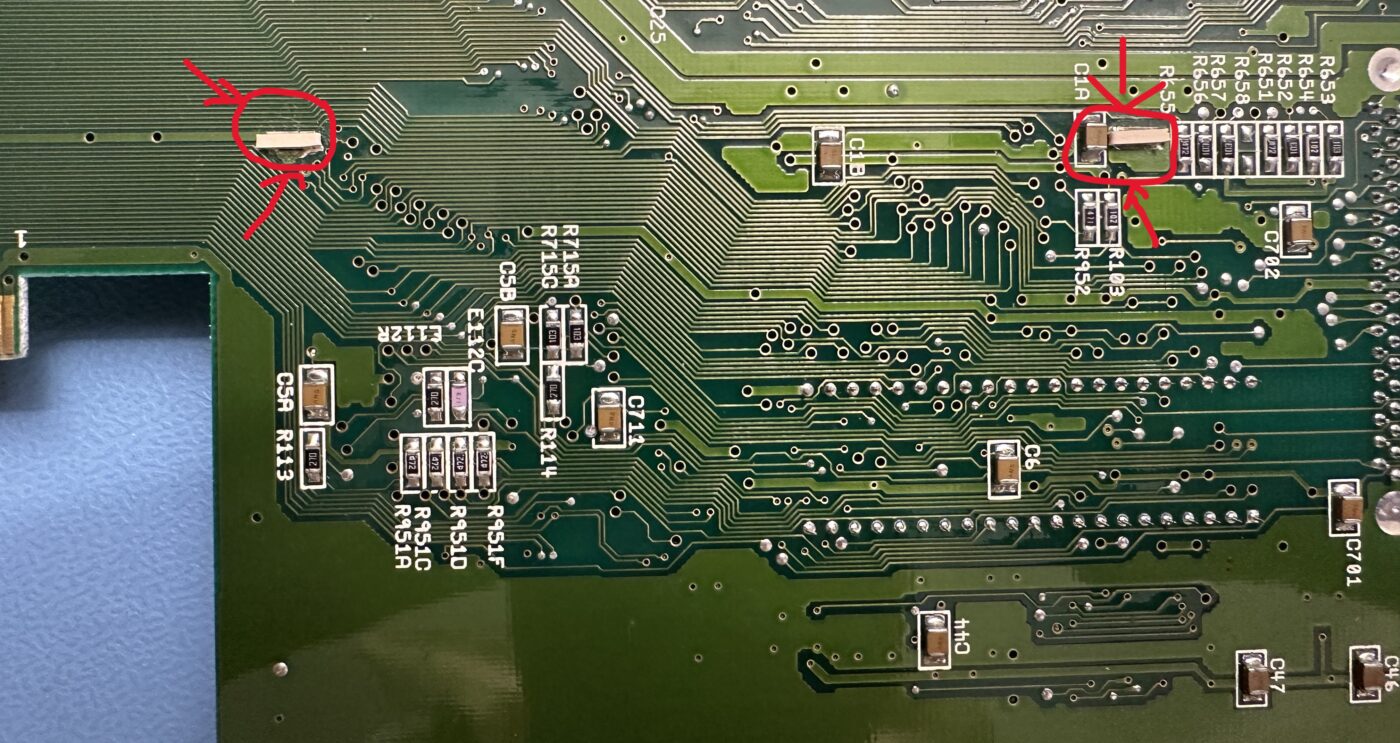
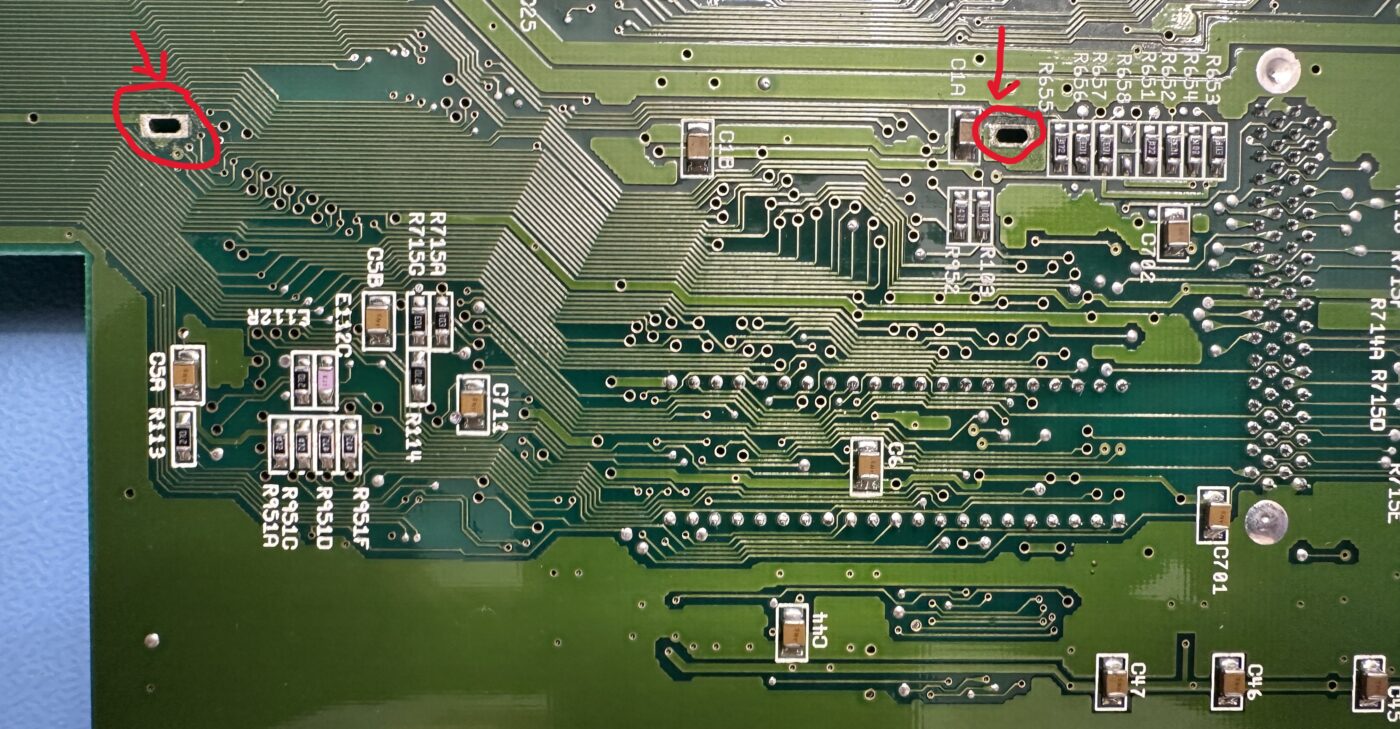
If you have received the 3D frame from us for mounting the memory expansion, you must first remove the mainboard from the housing. Then turn to the back and look for the 2 rectangular holes.

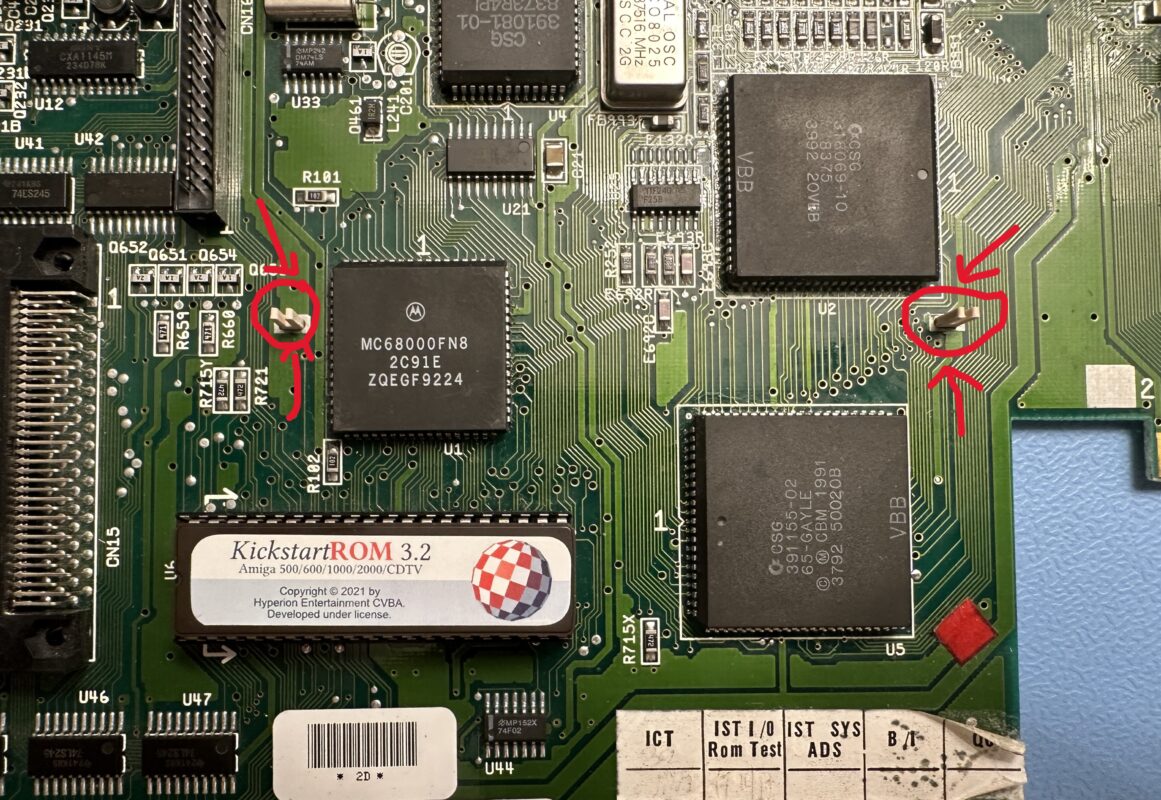
Please insert T-shaped pins into these holes. If they are too wide, please sand them down carefully with some sandpaper. For safety, we have included 2 sets consisting of pins and spacers.

If you have not received a mounting frame, then you have a memory expansion with a very strong socket from AMP which does not detach from the CPU even when you lift your Amiga by the memory expansion and you therefore do not need a frame.

Please turn the mainboard over.

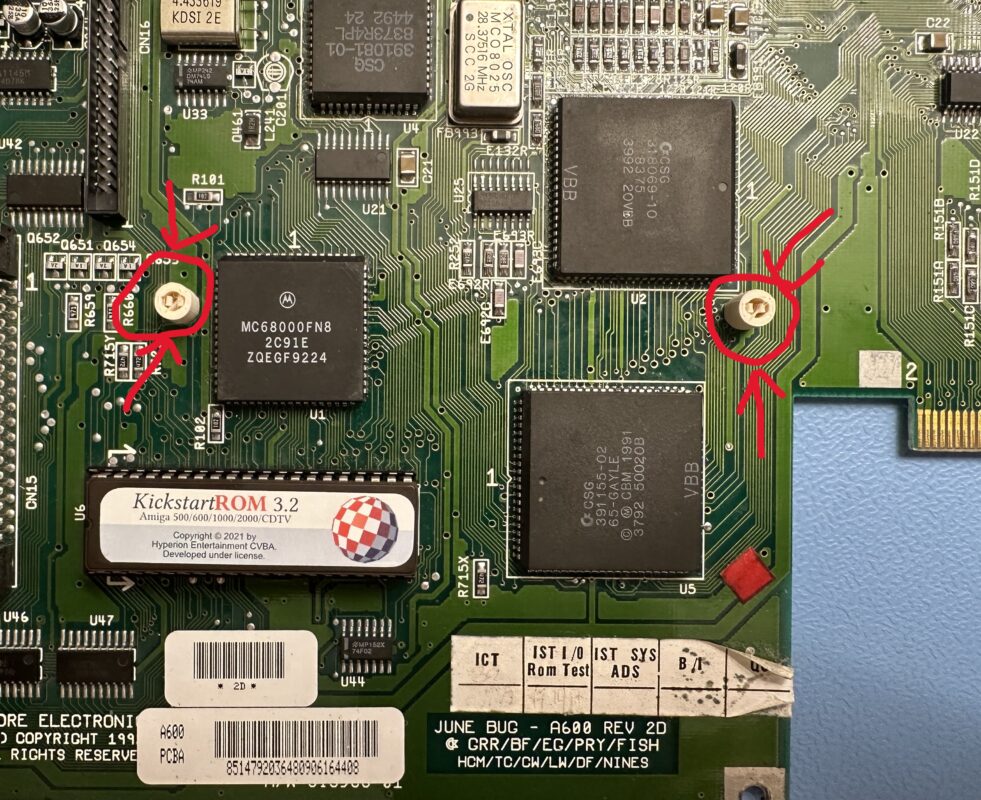
Now you have to attach the round spacers with the rectangular side.

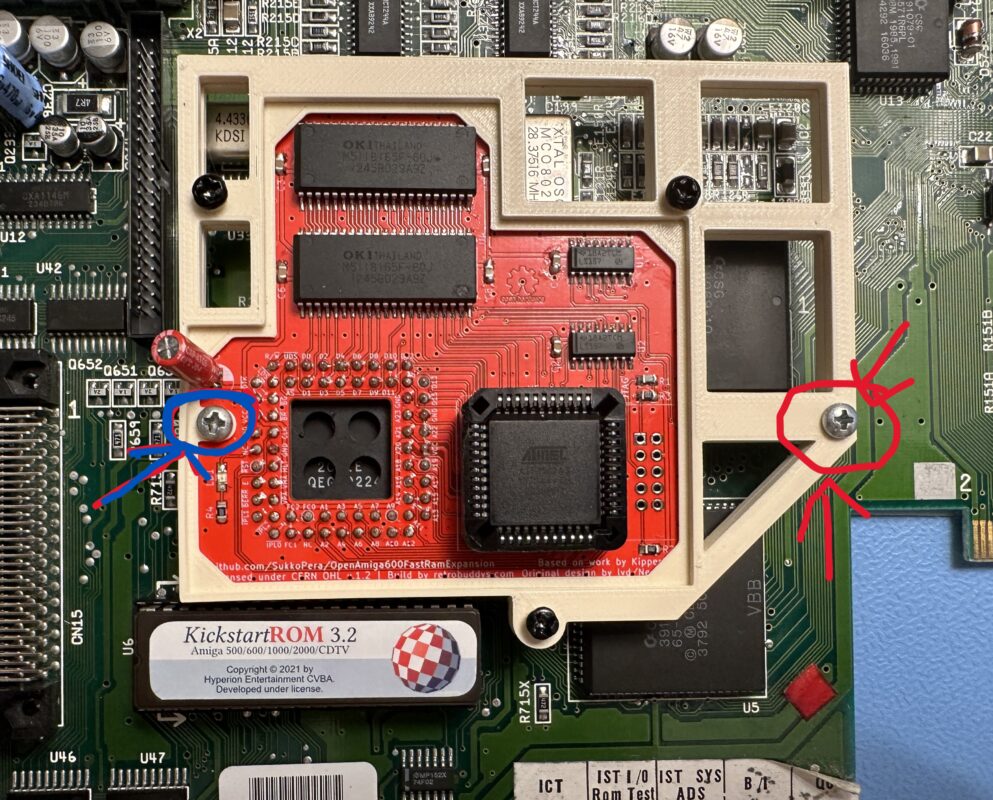
Finally, please attach and press on the memory extension and tighten it carefully with the screws supplied. Please remember that the frame is made of PLA plastic and breaks off easily.

After solid always comes from 😊

Before you reassemble your Amiga 600, please test it once with the Amiga test kit.

New Amiga products

In the next few weeks you will find a few new products in our store. On the one hand, these are additions from the existing portfolio, on the other hand, they are completely new projects.

You can look forward to the following products:

  • 4/8 MB FastRam for Amiga 500 (aka GottaGoFast)
  • Simple IDE for Amiga 500
  • PiStorm for Amiga 500/2000
  • Awesome 68k CPU Re-Locator
  • Amiga 500 Rev.3+5 Kickstart EEProm Adapter

In addition, we will offer all projects as “PCB Only” and “Kit”. We’ve had a few requests from the community for complete craft kits, especially in the last few weeks.